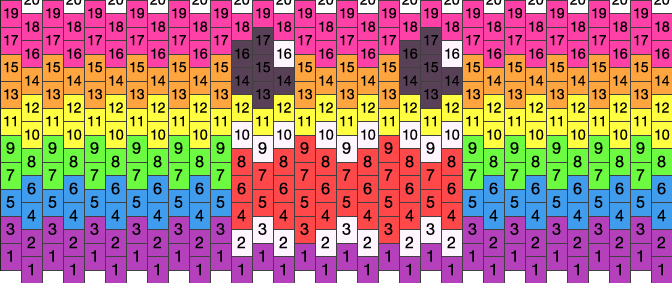
How to Read a Kandi Pattern – [Kandi Tutorial]
How to Read a Kandi Pattern
Kandi Pattern Example 1


Kandi Pattern Example 2


In example 2 you can see there are several different colors in row 1. To make the single here we would start on the right side and string on the beads in the staggering order they appear. (If you are left handed, like me, you can start on the left and it will work the same.)
The first row right to left should be:
1 white, 3 blue, 1 white, 5 blue, 1 yellow, 1 blue, 8 yellow, 7 blue, 2 green, 3 blue
This is where you would tie off the single and cut off the excess.
Starting row 2 your string should be between the first and last beads in row 1. (a blue & white bead here) Add the first bead in the 2nd row (blue) and it should sit on top of the first bead in row 1 (white) you should string through the second in row 1 (blue) and then add the second bead in row 2 (white) and continue this till the pattern is complete.
If this explanation was a little confusing don’t worry. You can check out the video tutorial here.
If you want more kandi tutorials check out the blog here.
About Ginger Cand-e

My name is Ginger and I’m an energetic kandi kid from Houston, Texas who now resides in Cincinnati, Ohio. I make kandi tutorials and rave advice videos every week.
Want to learn more about kandi, EDM, and raves? Hit the subscribe button to get all of my new videos delivered directly to your homepage.
Thanks so much for watching, reading, and subscribing!